Coming home to a broken garage door after a long day can be a major inconvenience. That simple act of pulling your car into your garage becomes an obstacle course.
That’s where having a few manual garage door repair tips at the ready can come in handy. For extensive repairs or issues with high-tension components like springs it's always best to call a trusted service professional for the safest approach.
For minor garage door hiccups, this guide can help you get back on track.
Table of contents:
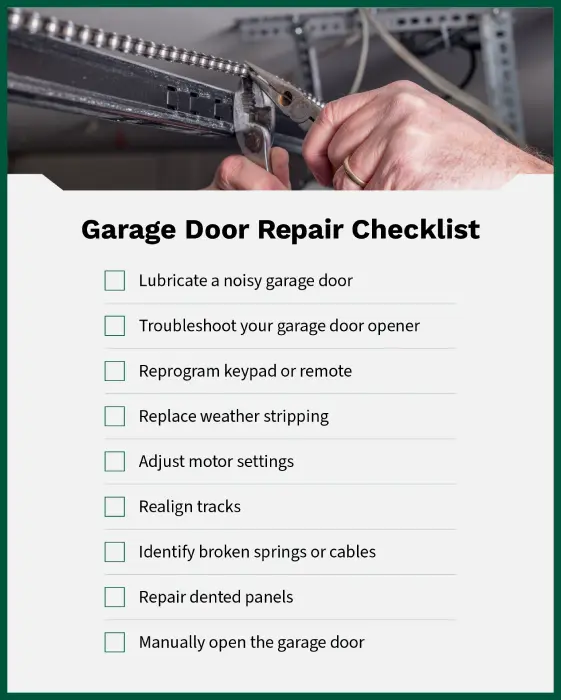
- 1. Lubricate a Noisy Garage Door
- 2. Troubleshoot Your Garage Door Opener
- 3. Reprogram the Keypad or Remote
- 4. Replace Weather Stripping
- 5. Adjust Motor Settings
- 6. Realign Tracks
- 7. Identify Broken Springs or Cables
- 8. Repair Dented Panels
- 9. Manually Open the Garage Door
- Trust Precision Garage Door Service for Timely Repairs
- FAQ

Step One - Lubricate a Noisy Garage Door
Noisy garage doors are often caused by friction between various components. This noise can stem from dirty tracks, dry rollers, hinges, or cables, or loose nuts and bolts.
- Clean the tracks using a stiff brush or cloth. Remove any accumulated dirt, debris, or old lubricant that may be causing friction and contributing to the noise.
- Lubricate rollers, hinges, and cables. Apply a generous amount of garage door lubricant to the rollers, hinges, and cables. Do not use a runny lubricant like WD-40, as it can attract dirt and grime. A silicone spray or white lithium grease are much better choices for garage door lubrication.
- Tighten loose nuts and bolts as needed using a wrench. Loose hardware can contribute to the noise and may eventually lead to more serious issues if left unaddressed.
- Replace worn or rusted rollers. Worn rollers can cause additional friction and noise and put strain on other components of the garage door system.
Replacing the rollers is an involved process, so you may want to consult a professional.
Step Two - Troubleshoot Your Garage Door Opener
Your garage door opener relies on precise sensors, a functioning power supply, and an unlocked door to function properly. One of the most common reasons for a malfunctioning garage door opener is dirt buildup on the sensors.
- Check for dirt buildup on the sensors, as it can cause issues. These sensors are designed to prevent the door from closing if an obstruction is detected (which could be something as minuscule as debris.) Use a soft brush, cloth, or compressed air to gently remove the dirt or debris on the sensors.
- Check for obstructions along the door's track that could impede movement, causing the opener to malfunction.
- Ensure the garage door opener motor is plugged in and receiving power. Sometimes, power cords can become dislodged or unplugged accidentally. If necessary, call professionals to reset any tripped circuit breakers or replace blown fuses.
- Check the garage door lock and ensure that the garage door isn't manually locked from the inside.
- Examine the opener for any noticeable signs of damage or malfunction.
Step Three - Reprogram the Keypad or Remote
If the batteries in your keypad or remote are low or dead, they won’t be able to send signals to the garage door opener, preventing it from functioning properly.
- Replace the batteries in your remote or keypad with fresh ones and see if that solves the problem.
- Reprogram your keypad or remote if a new battery doesn't do the trick. To reprogram, reset the remote’s connection with the garage door opener. This process varies depending on the model of your opener and specific manufacturer instructions. Generally, you'll need to access the programming buttons or settings on the opener itself and the keypad or remote.
Step Four - Replace Weather Stripping
Garage door weather stripping is a long strip of rubber or vinyl that lines the edges of your garage door and the frame it closes into. It acts as a seal and can wear out over time and become cracked or brittle. Aside from letting in drafts, moisture, and pests, deteriorated weather stripping can also increase your energy bills.
To remove old weather stripping:
- Park your car outside and secure the garage door in the open position using a block of wood or by disengaging the opener (consult your manual).
- Identify the attachment method. Most weather stripping is either nailed or glued on. Use a screwdriver or putty knife to gently pry off any nailed stripping. For glued stripping, you might need a utility knife to carefully cut it away from the frame.
- Work your way around the entire door frame, removing all the old weather stripping. Be careful not to damage the door frame itself.
To install new weather stripping:
- Measure the door frame to determine the length of weather stripping you'll need. Most stores sell weather stripping by the roll, allowing you to cut it to size.
- Clean the door frame thoroughly with a damp rag to remove any dirt or debris that might hinder the new weather stripping's adhesion.
- Install the new weather stripping following the manufacturer's instructions. Most nail-on stripping comes with pre-drilled holes for easy attachment. For adhesive stripping, carefully peel away the backing and press the strip firmly onto the clean door frame.
Step Five - Adjust Motor Settings
If your garage door motor runs but the door won't open, it could indicate an issue with the garage door opener's settings or components. One common reason for this problem is misaligned or improperly set limits on the garage door opener, which dictate how far the door opens and closes.
This misalignment can prevent the opener from operating the door effectively. To adjust motor settings:
- Locate the limit adjustment screws on the garage door opener.
- Identify the ideal limit and adjust the "up" or "down" limit based on the door's behavior.
- Turn the appropriate limit adjustment screw using a screwdriver and work in small increments.
- Test the door after each adjustment to check its movement until it opens and closes smoothly within the desired range.
If adjusting the limits doesn't resolve the issue, other components such as the main gear drive, trolley carriage, chain (for chain drive garage door openers), or a disconnected belt could be malfunctioning.
These parts play crucial roles in the garage door opener's operation and may require professional attention for repair or replacement to ensure proper functionality and safety.

Step Six - Realign Tracks
Misaligned tracks result from various factors such as loosely mounted garage door brackets, impact from objects, or simply wear and tear over time. When the tracks are not aligned correctly, the rollers can veer off track, preventing the door from operating properly.
- Check if mounting brackets are loose, as it can contribute to misaligned tracks. Over time, the vibrations from the garage door's movement can cause the mounting brackets to loosen.
- Inspect the tracks thoroughly for any signs of damage or wear. Look for dents, bends, or cracks in the metal tracks that may interfere with the smooth movement of the garage door rollers.
- Make sure tracks are at the correct level. When the tracks are level and aligned correctly, it allows the rollers to move smoothly along the track without any obstructions or binding. You can check the level of the garage door by placing a spirit level horizontally along the length of each track.
Step Seven - Identify Broken Springs or Cables
Springs and cables play crucial roles in counterbalancing the weight of the garage door, making it easier to open and close. If one of these components breaks, it can cause the door to become unbalanced or even completely inoperable.
Identifying broken springs or cables involves visual inspection. Look for any signs of damage or wear on the springs and cables, such as fraying, rusting, or gaps in the coils of the springs. Additionally, if the garage door appears uneven when opening or closing or if you hear unusual sounds like snapping or popping, it could indicate a broken spring or cable.
Address broken springs or cables promptly to avoid further damage to the garage door or potential safety hazards. However, due to the high tension and many things that can go wrong during a DIY spring door repair, we strongly advise against attempting to fix them yourself.
Instead, it's recommended to hire a professional garage door technician with the necessary expertise and equipment to safely repair or replace broken springs or cables. Professional technicians can accurately diagnose the issue, source the appropriate replacement parts, and perform the repair safely and effectively, restoring the functionality of your garage door system.
Step Eight - Repair Dented Panels
When you spot a dented garage door — whether due to accidental impact, weather-related damage, or wear and tear — it can affect the appearance and functionality of your garage door.
To repair minor dents:- Inspect the dented panels to determine the extent of the damage. Minor dents may include small creases or indentations in the panels without compromising their structural integrity.
- Use a heat gun or hair dryer to apply heat to the dented area. This helps make the metal more malleable and easier to manipulate.
- Use a plunger for shallow dents to pull the dented metal outward. Alternatively, gently tap the dented area with a rubber mallet or hammer to push the metal back into shape.
- Fill and sand should the dent have caused paint damage. If the metal is creased, you may need to fill the area with auto body filler and sand it smooth before repainting.
- Touch up the area with matching paint to restore the appearance of the panel after repairing the dent.
While minor dents may not impede the door's operation significantly, they can detract from the overall aesthetic of your home. And if left unaddressed, minor dents can potentially lead to larger issues over time.
Major dents, such as those that cause significant structural damage or compromise the integrity of the panels, require professional garage door repair services.
Step Nine - Manually Open the Garage Door
Power outages or other mechanical issues may prevent the garage door from opening automatically. In these situations, you may need to resort to manually opening it until the issue can be resolved.
To manually open a garage door:- Locate the emergency release cord. This cord is usually red and hangs from the garage door opener track.
- Pull the emergency release cord. Gently pull the emergency release cord down and away from the door. Pulling it disengages the opener from the opener carriage, allowing you to manually operate the door.
- Manually lift the door. Use caution, as garage doors can be heavy. Lift the door slowly and steadily, using both hands to support its weight.
- Raise the door to the desired height. Lift the door until it reaches the desired height, whether fully open or partially open, for ventilation or access.
- Secure the door. Once the door is in the desired position, secure it by placing a clamp or locking mechanism on the track to prevent it from accidentally closing.
Note that attempting to diagnose and fix garage door issues yourself can pose risks such as electrical shocks, injuries from moving parts, and further damage to the door or opener. Therefore, it's best to call professionals who have the expertise and tools to safely diagnose and repair the problem.

Trust Precision Garage Door Service for Timely Repairs
While DIY repairs can be tempting, remember that garage doors are complex and heavy. For guaranteed safety and a job done right, trust Precision Garage Door Service® for garage door repair and maintenance. We'll ensure your door works smoothly while avoiding risks like injuries and incorrect installations. That's our Neighborly Done Right Promise™: it's not done right, we promise to make it right.
Garage Door Repair FAQ
Why Won’t My Manual Garage Door Open or Close?
If your manual garage door refuses to open or close, worn-out or damaged rollers could be the culprit, hindering smooth movement along the tracks. These rollers can wear down over time, leading to misalignment or seizing up.
Replacing worn rollers typically resolves this issue. However, misaligned tracks or broken springs and cables could also be to blame. Misaligned tracks can cause binding or sticking, while broken springs or cables make the door too heavy to lift manually and pose safety risks. Consulting a garage door service professional is advisable for accurate diagnosis and safe repairs.
How Do You Reconnect a Garage Door After Manual Opening?
After manually opening your garage door with the emergency release cord (usually a red rope near the track center), you'll need to reconnect it to the automatic opener. With the door closed, pull the cord down to disengage the trolley.
Now, you can either slide the door manually until the trolley reconnects with the opener carriage (you'll hear a click) or use your remote. The opener will move the carriage to meet the trolley automatically. Once reconnected, test the door using your remote or wall button. If you have trouble or your manual mentions different steps, it is best to seek professional help.
Can You Repair a Section of a Garage Door?
Replacing a single section of a garage door is definitely possible, especially for minor dents or cracks. However, for larger holes or if the door is already in rough shape, replacing the entire door might be more cost-effective in the long run.
How Do You Open a Manual Garage Door With a Broken Spring?
Only open a manual garage door with a broken spring with someone’s help and extreme caution, if you can’t wait for professional garage door service.
- Pull the emergency release cord (usually red) near the track center.
- Slowly lift the door in sections with the help of a second set of strong hands.
- Secure the open door using sturdy support such as wood blocks.
Opening a garage door with a broken spring is dangerous due to the unbalanced weight of the door. It's strongly recommended that you opt for professional garage door repair services.
This article is intended for general informational purposes only and may not be applicable to every situation. You are responsible for determining the proper course of action for your property. Services should be performed by licensed and experienced professionals. Precision Garage Door Service is not responsible for any damages that occur as a result of this blog content or your actions. For the most accurate guidance, contact a Precision Garage Door Service professional for a custom, on-site assessment.